THE
3-D CO-ORDINATE SYSTEM
By now you should be very comfortable working your way around
the X-Y coordinate system. Anyway, here is a quick review.
Looking from the plan (top) view, this is what you see
to figure out where is positive X and positive Y.
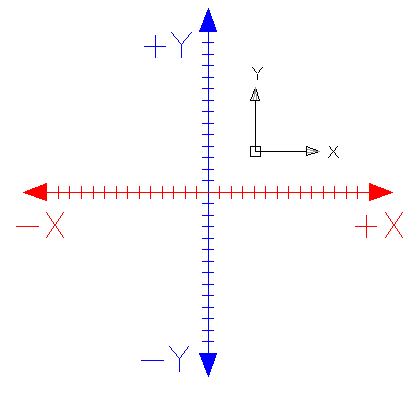
If you were to look at the same picture, but at a slight
angle, you would see the third axis. This new axis is
called the Z-axis. Imagine that the positive Z-axis is
coming towards you out of the monitor.
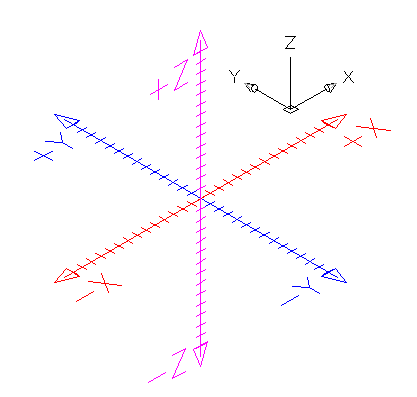
The Z-axis has always been there, lurking in the background,
waiting for you.
When you entered points previously, you would enter them in
the format: X,Y. By doing
this, you let AutoCAD know that in these cases, Z was
equal to zero. Entering 4,3 would
be the same as entering 4,3,0.
Now if you drew a line from the origin (0,0,0)
to a point at 4,3,2,
you would get a line that goes 4 inches to the right,
3 inches up and 2 inches towards you. The properties
of this line would be this:

Notice that the line is actually 5.3852" long.
If you were to look at it from the plan view, it would
look exactly like a line drawn from 0,0 to 4,3 Draw
a line from 0,0 to 4,3 and then compare the properties.
The diagrams below, show this line from 4 different views to illustrate how things can look different in 3D. Look at each one carefully, and see if it makes sense to you.
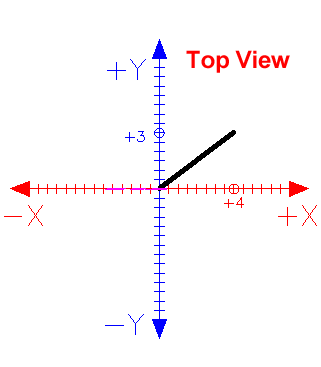 |
This is the usual view you have seen when using AutoCAD in 2D. You are looking straight down the Z axis (positive Z is pointing at your). It looks like any other line you have drawn, going from 0,0 to 4,3 - but there is a difference... |
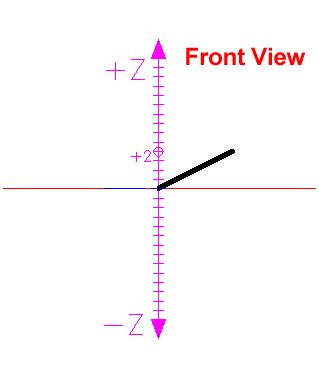 |
If you were to look at the line from the front, instead of the top (as shown above) you would be able to notice the elevation of 2 units in the Z axis. This is the same line as above, only viewed from a different angle. In this view, you are looking straight down the -Y axis. |
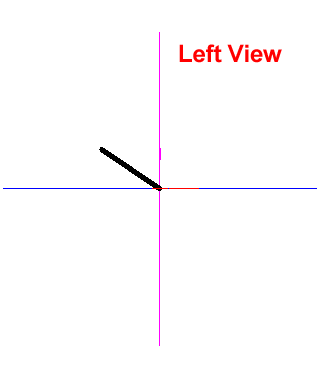 |
Just for fun, here is the same line but viewed from the left. This would be looking down the -X axis. |
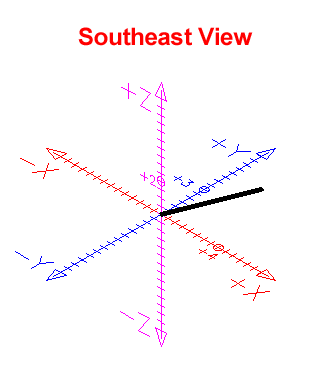 |
Finally, here is the line as viewed in 3D space from the Southeast view. This is where viewing 3D objects on a 2D monitor gets tricky. You need to visualize the Z Axis. |
What the above images show you is that you will have to get used to looking at a 3D world on a 2D monitor. In each image, the black line looks flat, but you have to use your reference points to determine where it truly is. If you don't understand this perfectly right now, don't worry. It's just an exercise to expose you to 3D viewing. As the lessons progress, you will get much more familiar to this.
Why is this important to look
at before entering the world of 3-D? If you
were to only look at a 3-D model from the plan (top)
view, you would not be able to see any difference between
the two lines. (Draw them and see for yourself) On a
3-D model, you can easily have many points over top of
each other. This would be very difficult to work with.
You may think you're snapping to a particular endpoint,
but the reality of it could be very different (think
of how the top of the wall looks the same as the bottom
of the wall if you're looking straight down it). Fortunately,
AutoCAD provides different viewing options for 3-D drafting.
This will be discussed in a later lesson, but for now,
if you want to see your 2 lines in a view similar the
Z-Axis image above, go to your menu called View > 3D
Views > SW Isometric. You'll see the lines that
look identical in the top view, look very different
when viewed from an angle.
3D Rotation
Now for the confusing part. You already know how to rotate 2D objects, but you also have to know how AutoCAD
measures angles of rotation in 3-D. There is a somewhat
simple rule for this called "The Right Hand Rule". To
figure out which is the positive rotation angle, imagine
that you are wrapping your right hand around the axis
with your thumb pointing towards the positive end. The
direction that your fingers are wrapped is the positive
direction. This applies to all three axes.
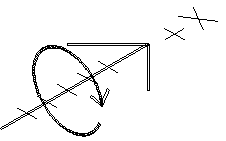
DIRECTION
OF POSITIVE ROTATION
The main point of this lesson is to tell
you that objects can trick you in 3D space. Shortcuts don't
always work, you have to be careful with Osnaps and your
drawing can turn into a mess very quickly if you're not
paying attention. Trust me, I've seen enough students take
the easy route and have to start over. If you want to learn 3D, review each lesson before progressing. Make sure you know the concepts inside and out. This is just an introduction to the concepts, you will learn more in the following lessons. You may still want to refer back to this tutorial, though.
|